December's Sewing Project
There may not have been anything homemade in Savannah's birthday package, but there was in her Christmas package. Thanks goes to her parents for suggesting she would like a quiet book. They had actually mentioned it earlier in the summer, but I forgot until the reminder in early December. Since this is a project I'd long been interested in trying, I was happy to dedicate some time to it, and I'm thrilled with the end result. Hopefully Savannah is as well!
Since I scoured the internet looking for ideas, I figure it's only fair to share the ones I chose. If I was being totally fair, I'd add links to all of my inspiration pages, but in reality I took bits and pieces from dozens of sites and created my own version. So, you can do the same as well.
I wanted it to be colorful and fun, with some easy pages and some to grow into. Once the idea came to have a rainbow theme, everything seemed to fall into place. Since I focused on red, yellow, blue, orange, green, and purple, it could just as easily have had a color-wheel theme. Someone had the suggestion to attach some items with magnets, and I thought that was a super cool idea. However, I couldn't get it to work well. It requires super heavy duty magnets to go through 2-3 layers of felt. That's something I can experiment with again in the future. I had a pleasant enough experience with this project that I'm willing to make another one someday.
So, without further ado, here are the finished pages. I think they're all fairly self-explanatory, but feel free to add a comment if you have any questions.
I used thick interfacing (Pellon #50) for the pages and double-layered felt for all of the pieces. I remembered to follow the tip to put the "soft" side of the Velcro on the page, and the "pokey" side on the pieces, but it still seemed to be prone to snagging and I wonder if there's a better method. I used some scrap fabrics (having the lining match her bapron from last year was unintentional, coincidental, but kind of cool and amazing) with lighter interfacing for the cover, adding an applique on the front (a little off-center) and a pocket in the back before sewing them together. I sewed each set of double pages right-sides together, turned, then top-stitched each page before sewing them all together down the center to make the book.
Here's the order for compiling the pages, with two activities on each 10x20" rectangular page. That seemed to be a good size for me; you can choose whatever size you want. I then cut the cover pieces at 11x21".
Once 8/1 and 2/7 are sewn together, then 6/3 and 4/5, and stacked on top of the cover, everything should be in the proper place. Of course, it really doesn't matter what order the pages are in, but if you want to plan in advance, you can. This turned out well enough that I made a second, identical one (except for switching to have snaps on the balloons and Velcro on the shapes and modifying the front page rainbow). Who should my next one be for? And should it be identical, or should I try a new theme?
 |
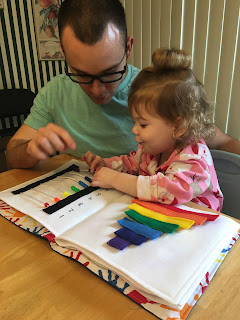
| It looks like she might be. |
I wanted it to be colorful and fun, with some easy pages and some to grow into. Once the idea came to have a rainbow theme, everything seemed to fall into place. Since I focused on red, yellow, blue, orange, green, and purple, it could just as easily have had a color-wheel theme. Someone had the suggestion to attach some items with magnets, and I thought that was a super cool idea. However, I couldn't get it to work well. It requires super heavy duty magnets to go through 2-3 layers of felt. That's something I can experiment with again in the future. I had a pleasant enough experience with this project that I'm willing to make another one someday.
So, without further ado, here are the finished pages. I think they're all fairly self-explanatory, but feel free to add a comment if you have any questions.
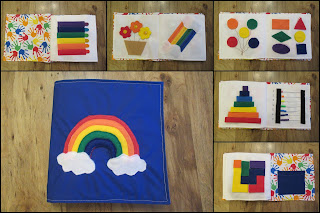
1 - flowers with button centers
2 - zipper page
3 - balloons on Velcro
4 - shapes on snaps
5 - colored craft sticks in felt pockets
6 - counting beads
7 - pyramid stack using Velcro
8 - felt Tetris-type puzzle
 |
| This isn't actually the order in which I have them in the book, but the order that looked prettiest for this picture! |
I used thick interfacing (Pellon #50) for the pages and double-layered felt for all of the pieces. I remembered to follow the tip to put the "soft" side of the Velcro on the page, and the "pokey" side on the pieces, but it still seemed to be prone to snagging and I wonder if there's a better method. I used some scrap fabrics (having the lining match her bapron from last year was unintentional, coincidental, but kind of cool and amazing) with lighter interfacing for the cover, adding an applique on the front (a little off-center) and a pocket in the back before sewing them together. I sewed each set of double pages right-sides together, turned, then top-stitched each page before sewing them all together down the center to make the book.
Here's the order for compiling the pages, with two activities on each 10x20" rectangular page. That seemed to be a good size for me; you can choose whatever size you want. I then cut the cover pieces at 11x21".
 |
| It's not as pretty without the top pieces! I just used permanent markers to draw the "matching" shapes freehand. |
8 and 1
2 and 7
6 and 3
4 and 5
Once 8/1 and 2/7 are sewn together, then 6/3 and 4/5, and stacked on top of the cover, everything should be in the proper place. Of course, it really doesn't matter what order the pages are in, but if you want to plan in advance, you can. This turned out well enough that I made a second, identical one (except for switching to have snaps on the balloons and Velcro on the shapes and modifying the front page rainbow). Who should my next one be for? And should it be identical, or should I try a new theme?

Comments