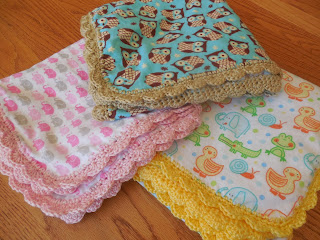
Baby Blanket
A few years ago someone told me about "wing-tipped" needles, which are used to prepare fabric for a crocheted edging. After a while I finally got one and made a few baby blankets to give away. I felt like preparing a few more for future babies this month, and couldn't find my original instructions. So I don't have that problem the NEXT time I get into this mood, here they are.
I used 1 1/4 yards of 44" flannel from Joann, which happened to be on sale for $3 a yard last week. One yard would be fine, but I liked the idea of making it more square. I also used around 3 ounces of regular yarn. When my grandmother made these, she used the cotton thread, and maybe next time I'll try that, but regular yarn still works.
Trim the flannel so it's even, and round the corners (using a small bowl) if you don't want to deal with mitered corners. Serge the edges and then "poke" the holes using a wing-tip needle without thread. I set my machine to it's widest width and longest stitch. The first one I lined up the fabric so the needle zig-zagged over the serged edges, but the second one I lined up the fabric a little to the right, or along side the right edge of my presser foot. That allowed me to fold back the edge when crocheting.
The first round is the most tedious, because the crochet hook (even using the smallest I had, a size ) is still bigger than the hole created by the needle. It took about two hours, but was the perfect task for our four hour drive to Gainesville. Remember to use every other hole, or the ones furthest from the edge, and make a single crochet in each one, and slip stitch to the beginning stitch.
For the second round, which took about a half hour, chain one, and then do a single crochet in each stitch around. On each corner, I picked one stitch to do two single crochets in to help it lay more flat.
For the third round, which took about an hour, I made the shell stitch edging. The pattern for that is five double crochet in one stitch, skip a stitch, slip stitch in the next stitch, skip another stitch, and then keep repeating. Slip stitch into the beginning of the round and fasten off.


Comments