Joe the Plumber
or maybe Handy Andy, but NOT Plumber Bob!
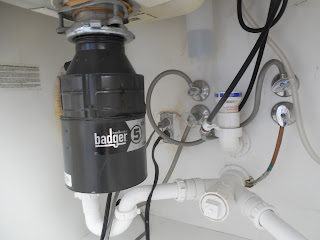
A week or so ago I discovered that when I emptied the rinse bucket down the kitchen sink, water collected on the cupboard floor. That's not good! Investigation showed that the garbage disposal had begun to corrode and a crack was developing. Before it got any bigger, we decided we ought to replace it, so we did.


A week or so ago I discovered that when I emptied the rinse bucket down the kitchen sink, water collected on the cupboard floor. That's not good! Investigation showed that the garbage disposal had begun to corrode and a crack was developing. Before it got any bigger, we decided we ought to replace it, so we did.

Wayne's quite handy, and according to him, this is actually one of the easiest repairs to do. The steps are pretty straight-forward, and were all laid out in the instructions that came with the new unit. First, unplug the machine and disconnect the pipes from the old one. (We had two - the flexible tube from the dishwasher and the drain pipe under the sink.) Unscrew the old disposal and lift it out. I wasn't home for the drain hole replacement, so I'm not sure exactly what was involved with that, nor what the part is really called, but it did take a fresh pot of plumber's putty, and now we have a shiny flange (I looked it up) with the imprinted labels aligned properly.

Make sure the new one is wired correctly, then attach it to the support flange. Re-attach the pipes. (We did clean them out first, but used the existing ones.) Test for leaks, then plug it in and make sure it works. It did! Now we have a fancy Badger 900 Plus under our sink. We upgraded from the builder's grade 1/2 HP motor to a 3/4 HP one, which supposedly is better for this size house. We'll see if it makes a difference.
And just so I remember in the future, the red "reset" button is underneath the unit. (You may need to twist the center knob with an allen wrench.)

I also learned that disposals don't have sharp blades. They use centrifugal force and a grater-like ring to emulsify whatever is dropped into them and propel it out the drain. Now maybe you learned something new as well!
 |
| Our model is a continuous feed type so doesn't have the stopper switch. |
Comments