The Easter Craft Experiment
Earlier this month I looked at my Easter Pinterest board. After all, what's the point of having one if you never do anything with it? I was intrigued by the eggs that I found here. Isn't that awesome? And so I decided that it would be a great little Easter treat for my seminary students if I could get it to work.
I raided the craft closet and discovered that I had everything I needed - balloons, embroidery floss and glue. (The comments on that link said glue could be used instead of the starch/flour mixture. I figured I probably had the liquid starch somewhere, but I didn't feel like searching for it right then.)
Try #1:
I was unable to fit any candy into water bomb balloons, so I just wrapped the empty (but air-filled) balloons with the glue-dipped floss. I had a larger balloon (the 9" helium-quality size) into which I could fit some candy, so I used that as well, but only blew it up to 4" or so.

 The next morning I popped the balloons. The tiny ones turned out wonderfully, the larger one not so much. I wish I had a video of the balloon collapsing, pulling in the floss with it. I guess I should have used more thread or something.
 Try #2:
After a stop at the store to pick up some different balloons and some actual Easter candy, I tried again. These balloons came in a package with the party stuff at the grocery store, and I was able to fit three Hershey eggs inside them, although not without difficulty. First I used the pump to inflate the balloon, then deflated it. The candy kept rolling around; balancing it on the top of the funnel helped. (Later I used the lid of a highlighter, because the funnel tip was still too small.) I'd stretch the balloon opening over the propped-up candy to get it into the "neck" of the balloon, then inflate it until the candy dropped inside, repeating those steps twice more. The last step was to do the actual inflating and tie the knot. I thought I could do this step ahead of time, but it's a good thing I only did two, because the next morning those two had deflated. So I learned you need to wrap soon after filling.
 This time I hung it over the cabinet door knobs to dry overnight.
 Success!

Try #3:
Working with the glue was really sticky and kind of frustrating, so after doing a few more eggs, I hunted down my starch bottle and decided to give that version a try. I wrapped one egg in plain starch and another in the flour/starch mixture the original poster suggested.

 Try #4:
The easiest way to do this was to pour some glue in the bottom of a bowl, unwind the floss skein into the bowl, drizzle the top with some more glue, and then start wrapping. Since I was doing 20 of them, I actually reached the point where it wasn't quite so sticky and frustrating.

 Popping the balloons was actually the fun part! You never knew what to expect. I tried videotaping a few of them just for you; it didn't work so well without a second person. This was the best if you want an idea of what happens when you poke the balloon.
Sometimes it deflated too quickly, and then I had to do some finagling with the scissors to get the candy out of the deflated balloon.
 Success!
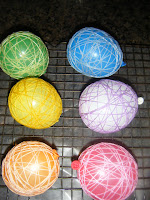
 The finished product -
 Although the picture doesn't do it justice, they actually turned out okay. Just remember to use glue!
I raided the craft closet and discovered that I had everything I needed - balloons, embroidery floss and glue. (The comments on that link said glue could be used instead of the starch/flour mixture. I figured I probably had the liquid starch somewhere, but I didn't feel like searching for it right then.)
Try #1:
I was unable to fit any candy into water bomb balloons, so I just wrapped the empty (but air-filled) balloons with the glue-dipped floss. I had a larger balloon (the 9" helium-quality size) into which I could fit some candy, so I used that as well, but only blew it up to 4" or so.

I discovered the kitchen chandelier made a decent hanging rack, where they stayed overnight.


After a stop at the store to pick up some different balloons and some actual Easter candy, I tried again. These balloons came in a package with the party stuff at the grocery store, and I was able to fit three Hershey eggs inside them, although not without difficulty. First I used the pump to inflate the balloon, then deflated it. The candy kept rolling around; balancing it on the top of the funnel helped. (Later I used the lid of a highlighter, because the funnel tip was still too small.) I'd stretch the balloon opening over the propped-up candy to get it into the "neck" of the balloon, then inflate it until the candy dropped inside, repeating those steps twice more. The last step was to do the actual inflating and tie the knot. I thought I could do this step ahead of time, but it's a good thing I only did two, because the next morning those two had deflated. So I learned you need to wrap soon after filling.


Try #3:
Working with the glue was really sticky and kind of frustrating, so after doing a few more eggs, I hunted down my starch bottle and decided to give that version a try. I wrapped one egg in plain starch and another in the flour/starch mixture the original poster suggested.

When I checked them the next morning, they didn't look so great. The plain starch one held its shape; however, it just felt fragile and the end of the string needed to be glued down so it wouldn't unravel. The one with flour had just collapsed and fallen apart. Maybe it was the balloon's fault; maybe not. Either way, I decided to stick with the glue method.

The easiest way to do this was to pour some glue in the bottom of a bowl, unwind the floss skein into the bowl, drizzle the top with some more glue, and then start wrapping. Since I was doing 20 of them, I actually reached the point where it wasn't quite so sticky and frustrating.

I didn't have enough cupboard knobs, but the cookie cooling rack worked just fine.


Comments